Wednesday, December 16, 2009

Frog Ornament

After I made the sunflower ornament for DS#1's teacher, DS#2 wanted me to make an ornament for his teacher. He knew she likes frogs, so he asked for a frog ornament. I searched and searched the internet and could not find a pattern for a frog ornament. I figured I might as well take a shot at making my own. Rather than make a whole frog (I only had a week to make this), I decided to make a frog head. I borrowed an idea from a CD coaster I had crocheted, and decided to use a used canning lid to give the frog stability.

In retrospect, it would have been easier to attach the eyes and tongue and stitch the mouth before joining the front and back around the canning lid, so that is how I wrote the pattern. If you find any mistakes, please let me know, so I can correct them!

Materials:
Small amount of WW yarn in green, white and black
Small amount of sport or baby weight yarn in pink
Regular-mouth canning lid
F hook
D hook

Directions:

Front:
With green and F hook, ch 4, join to form loop.
Round 1: Sl st in loop. Ch 1. 11 sc in loop. Sl st in ch 1 to join. (12 sc)
Round 2: Ch 3. Dc in same st. *2 dc in next st. Rep from *. Sl st in top of ch 3 to join. (24 dc)
Round 3: Ch 3. Dc in same st. *2 dc in next st. Rep from *. Sl st in top of ch 3 to join. Fasten off. (48 dc)

Back:
Ch 4, join to form loop.
Round 1: Sl st in loop. Ch 1. 11 sc in loop. Sl st in ch 1 to join. (12 sc)
Round 2: Ch 3. Dc in same st. *2 dc in next st. Rep from *. Sl st in top of ch 3 to join. (24 dc)
Round 3: Ch 3. Dc in same st. *2 dc in next st. Rep from *. Sl st in top of ch 3 to join. Fasten off. (48 dc)

Eyes (make 2):
With black, ch 4, join to form loop.
Row 1: Sl st in loop. Ch 1. 6 sc in loop. Fasten off.
Row 2: Join white yarn with sl st. Ch 1. Sc in same st. *2 sc in next st. Rep from * to end. Fasten off.
Row 3: Join green yarn with sl st. Ch 1. *Sc in next st. Rep from * to end. Fasten off.

Tongue:
With pink and D hook, ch 5.
Row 1: Sc in 2nd ch from hook. Sc in each ch to end, turn.
Rows 2-10: Ch 1. Sc in each st to end, turn.
Row 11: Ch 1. Sc tog first two st. Sc next two st, turn.
Row 12: Ch 1. Sc tog st. Fasten off.

Assembly:
With green yarn and working in back loops of last row, attach eyes to top edge of front with sl st.

With black yarn, sl st around posts of 2nd round, joining starting ch of tongue, to form smile.

Attach a loop of green yarn to the back between the eyes to form hanger.

Sl st front and back together with green yarn. About halfway around, insert canning lid and continue to sl st around lid.

Saturday, December 12, 2009

Sunflower Tape Core Ornament

I modified the Tape Core Wreath pattern to make a Christmas ornament for my oldest son’s teacher who likes sunflowers. The picture doesn't really show it very well, but the yellow part is ruffled.

Materials:
Small amount of ww yarn in bright yellow and brown
Tape core
F hook
Ribbon, embroidery floss or yarn for hanger

Stitches:
Ch=chain
Sl st=slip stitch
Sc=single crochet
Dc=double crochet

Directions:

With brown, ch 4, then join to form a loop.
Round 1: Sl st in loop, ch 1. 12 sc in loop. Sl st in ch 1. (12 sc).
Round 2: Hold circle formed in round 1 in center of tape core. All stitches should be stitched around tape core as well as in stitches of previous round. Ch 1. Sc in same st. *2 sc in next st. Rep from *. Join with sl st in ch 1. Fasten off. (24 sc).
Round 3: With yellow, join with sl st. Ch 3. 3 dc in same loop. *4 dc in next st. Rep from *. Join with sl st in ch 3. Fasten off. Weave in ends.

Monday, June 22, 2009

Kids in a Craft Store

My two boys are very active "boys' boys". They enjoy playing outside, running, playing with cars, rough-housing. In short, everything boys typically enjoy. Being an artistic, indoorsy mother to these two balls of energy has been a challenge. I've tried teaching them the art of being still, but 2 minutes later, and they're off again.

After I instituted a no-TV-after-supper rule, they became more interested in my crafting--largely crochet--as they saw me working on it. Thomas got a couple of kids' craft books and spend hours poring over them, trying to figure out what to make. Josh helped me choose yarn for my next project.

Yesterday, the first day of summer and one of the hottest days of the year so far, we made our more-or-less monthly trip to St. Joseph, Missouri, the closest town with a craft store. Our second stop (after the bakery outlet) was JoAnn's Fabric and Crafts. Usually, my visits to craft stores are exercises in frustration, trying to control two bored boys who try to entertain themselves by running up and down the aisles. Today was different, though. We were going to get them a craft kit they could work on during no-TV time.

After much deliberation, Thomas chose a beginner sewing kit with a teddy bear. He wanted to make the bear for his little brother. Josh chose a wooden picture frame that he could color with markers. With two excited boys, we headed for the checkout.

Then I saw it. A beautiful brilliant blue glass pendant, in a display of pendants on sale. Just across the aisle was a small rack of glass beads. I stopped to look at the pendant, then tried matching it with various strands of glass beads. At last I chose a strand of beads with the same brilliant blue, mixed with deep green and gold.

As I deliberated on whether or not to buy them, I learned a lesson. My boys can be extremely "helpful" when they're so minded.

"Ooh, Mommy, you'd like this one!"

"Mommy, this one's pretty!"

"Mommy, this would go good with that one!"

"Mommy, I really like this one!"

We were drawn in to the bead aisle like magpies before the motherlode of shiny objects. The kids were as mesmerized as I was. Rows of pendants sparkling with rhinestones. Colorful glass beads hanging from racks just begging to be fondled and held up to the light. Beautiful glass pearls in soft colors. Tiny drawers with hidden bead treasures. Josh was even intrigued by the textures of the beads and the way the hanging strands sounded when they struck each other.

In the end, I bought the pendant and the strand of blue, green and gold beads, as well as another strand of slightly smaller blue beads for accent and some clasps. What was far more important than these bits of glass and metal, though, was the fact that I had connected with the boys.

I knew it would not last. It may not even happen again. But for one moment, one precious trip, we were all three of us caught up in the same magic and wonder.

Tuesday, December 16, 2008

Patchwork Ornaments

Even younger children can make this easy ornament, and it takes under an hour to complete. When finished, it looks like it's quilted or patchwork.

Materials:
Scraps of at least 2 different fabrics
1 Styrofoam ball
Jute twine
1 upholstery tack
Popsicle stick
Bamboo barbecue skewer

Directions:
Begin by cutting your fabric into small pieces. Shapes don't matter so much. Take one piece to start and place it on the Styrofoam ball. Using the sharp end of the skewer, poke the edge of the fabric into the Styrofoam. Repeat with more fabric scraps until the ball is covered. When done, press the twine into the "seams" with the popsicle stick. You don't have to cover every seam--you don't even have to use the twine at all, but it does hide the seams and add a little charm. For finishing, make a hanging loop with the twine and use the upholstery tack to fasten it to the ornament. That's all there is to it!

There is a lot of room for variation in this. You can use whatever scraps of fabric you have to create different effects. It takes a very small amount of fabric. You could use decorative cording or pearl strands in place of the twine. You could even use shapes cut from packing foam (you know, those awkward pieces of Styrofoam that encase breakable items in their boxes).

Saturday, November 29, 2008

Tape Core Change Cup

After making the Tape Core Wreath, I started brainstorming about what else one could make with tape cores, particularly the large ones from packing tape. A package of just such cores from a fellow PackratCrafter (thanks Rhonda!) fueled the brainstorm.

I decided I wanted to make a box sort of thingy, using a technique similar to the tape core wreath. Unfortunately, it didn't quite work out that way, but it was an interesting lesson in being creative and adapting. A quick search of the internet let me to the conclusion that patterns did not exist for what I wanted to do, so I played. Here is the end result:

Unfortunately, I did not keep very good records of what exactly I did. This is more of the general idea than a specific pattern.
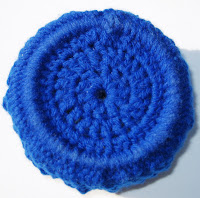

I started out with the bottom. I like to use the four-chain ring to start rounds. I double-crocheted for a couple of rounds, then half-double crocheted the final round. You want your bottom to be a little smaller than the diameter of the tape core.


Next is the hard part. Single crochet the next round around the tape core. You will end up with big loops around the tape core. As annoying as this step is, it is necessary to cover up the ugly cardboard of the tape core. I did 2sc in one hdc, 1sc in next hdc, rep until end. This took me several attempts to get it right, and I ended up frogging it more times than I would have liked, but stubbornness won out.


Now, you could stop there, but why? I thought it looked a little plain, so I figured I'd play with patterns along the side. I did a 3dc cluster for the first round, because there were so many stitches. Then I did ch 1, 1sc, ch1, 2sc, *sk next st ch 2, 2sc, ch1, 2sc in next st (rep from *). Join last ch2 with first ch1. (This is a simple sc shell in case my directions aren't clear.) I did this for 2 rounds. For the last 2 rounds, I used a simple ch3 edging (ch4, sc in first ch2-sp, ch 3, sc in next ch2-sp). On the first edging round, I crocheted in the loops from joining the bottom to the tape core to keep the sides from flopping down.

This now makes a nifty little cup for holding pocket change or whatever.


Thursday, October 16, 2008

Crocheted Hanger

I seem to have accumulated an ungodly amount of wire hangers. I have a theory that they, like paperclips, are a stage in the life cycle of a sock. Lost socks are the cocoons from which paperclips emerge, which then grow into wire hangers.

Okay, so maybe not. But they're still an annoyance. They leave little puckers in clothes and strappy stuff slides right off. Not to mention they seem to get tangled together easily and are just plain ugly.

I have a few crochet-covered hangers that I acquired at some point that are so much better. I knew there had to be a way to make them, if I could just figure it out. After some searching on the internet, borrowing from email groups and trial and error, here is the pattern I've come up with. It's pretty simple, just a little time consuming. This is a great project to work on while watching TV.

Crocheted Hangers

Free Image Hosting at www.picturetrail.com (Click for a larger view.)

Materials:
Yarn (I didn't measure how much each hanger took, and it might vary depending on your hanger, but they do take a fair amount. The good news is that it's the perfect use for all that ugly yarn you have lurking in your workbasket.)
F Hook
Wire hanger

Starting Chain: Ch the length around the triangle part of the hanger, plus about 1 inch.
Row 1: DC in third ch from hook and each ch to end.
Row 2: Ch 3. DC in each DC to end.
Row 3: Ch 1. Fold cover around hanger (use seam between rows as a guide). SC in DC and bottom of starting ch to end. Fasten off.

Thursday, October 9, 2008

Playing with Plarn Part 3: What To Do With Scraps

One of the downsides to making and using plarn is the scraps involved. The bottom seam, handles and any strips too torn to salvage all become essentially waste. I've struggled with what to do with these bits of plastic. Here is what I've come up with.
  • Throw away. This is perhaps the least desirable way of dealing with them. Part of why I craft with plarn is to keep from throwing away plastic bags.
  • Save and add to the plastic bag recycling collection receptacles at various stores. Slightly more desirable than throwing away, although I have heard stories about where these plastic bags really end up (the trash). I also think about the poor, unsuspecting plarn-crafter who might get their bag supply from these receptacles. I wouldn't be too happy to get someone else's scraps.
  • Use to stuff plarn creations, such as stuffed animals. Please note that plarn creations should not be given to small children to play with. They are, after all, plastic bags. (I did have an idea once to make a plarn cat bed after one of my cats showed a surprising tendency to nest on my neatly flattened bags. I haven't done it, as that cat sadly passed away before I could even start.)
  • Use as fringe for plarn rugs, although it won't hold up as well as the rest of the rug.
  • Another idea I haven't tried yet is fusing. Fusing is basically ironing pieces of plastic together to make a sort of fabric. I would think you could fuse the scraps, but, again, I haven't tried it, so I can't vouch for it. If you happen to try it, let me know how it turns out.

Here's my challenge, now that you've read all about plarn. What creative ways can you come up with for dealing with scraps?